Sometimes you may experience the "Forbidden 403" error in TFS2010 when you try to access the workitems from Dashboard in Sharepoint site.
Here is the solution for that;
1) Login to the TFS Application server
2) Locate the directory "C:\inetpub\wwwroot\bin"
3) Give Write permission for the users of TFS
Bingo, now you should be able to access workitems from Dashboard.
Showing posts with label TFS. Show all posts
Showing posts with label TFS. Show all posts
Monday, December 13, 2010

Monday, November 8, 2010
TFS2010 Team build automation - workaround
The builds in TFS2010 will work smoothly for .NET 4.0 and even .NET 3.5, .NET 2.0 solutions. But there is a catch here. The build of solutions in .NET 3.5 and below will fail with the issue saying “GenerateResource task failed unexpectedly..… FileTracker.dll missing….” when they have resource files.
This is the known issue in TFS2010. Microsoft tried to introduce a new concept of Incremental builds in TFS2010. This has caused this known issue.The solution is to add "TrackFileAccess = false" in the GenerateResource task. This is the work around suggested by Microsoft.
But, what to do if need to enable the build of Setup & Deployment projects? MSBuild do not support the build of .vdproj files which are nothing but setup & deployment projects. So to enable this, we need to call devenv.exe process to do this. But “TrackFileAccess” property is not supported in .NET 3.5 Microsoft.Common.tasks.dll and we will get build error :(
To solve both these issues, the following is the approach which can be helpful.
1)

2) Locate the Microsoft.Common.targets file. Copy-Paste this file and rename to Microsoft.Common.targets.CSharp

3) Open the file “Microsoft.Common.targets.CSharp” and locate the “GenerateResource” task in the file. Add the attribute “TrackFileAccess = false” in there as shown below

4)
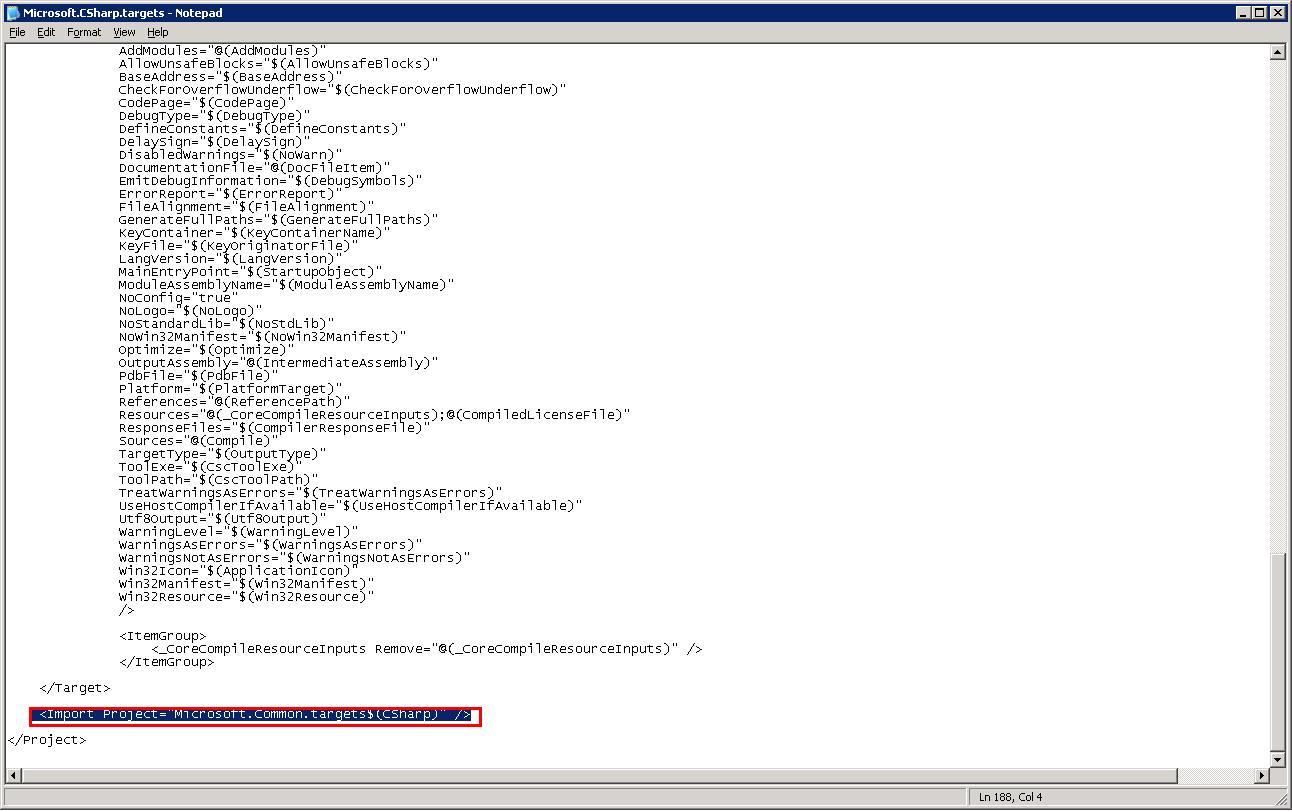
5) Adding the MS Build arguments
a. Go to TFS Builds
b. Select the build
c. Edit build definition and then go to “Process” section
d. Expand “Advanced” build process parameters
e. Locate “MS Build Arguments”
f. Add this statement “/p:CSharp=.CSharp”

what actually we are trying to do here is, whenever we initiate team build, we are passing the value for MSBuild argument "$(CSharp)", so the imported file will be Microsoft.Common.targets.CSharp which contain TrackFileAccess = false property in GenerateResource task. When we build the solution using devenv.com or devenv.exe commands, we don's pass the value for that MSBuild argument which in turn import the file Microsoft.Common.targets which do not contain TrackFileAcess property in GenerateResource task.
Wednesday, December 9, 2009
Team build definition for WiX project
Here is the settings you need to do for creating team build for WiX projects.
Add the following piece of code in the .proj file;
<PropertyGroup>
<CustomBeforeWixTargets>$(MSBuildExtensionsPath)\Microsoft\WiX\v3.0\wix.ca.targets</CustomBeforeWixTargets>
</PropertyGroup>
<Target Name="Wix">
<Message Importance="low" Text="Starting WIX build"/>
<MSBuild Projects="@(WixProjectToBuild)" Properties="OutDir=$(OutDir);SourcePath=$(OutDir);Version=$(AssemblyVersion);FileVersion=$(AssemblyFileVersion);BuildNumber=$(BuildNumber);CustomBeforeWixTargets=$(CustomBeforeWixTargets)" Targets="Rebuild"></MSBuild>
</Target>
<!--WIX solutions-->
<ItemGroup>
<WixProjectToBuild Include="$(BuildProjectFolderPath)/../../Source_Code/Development/Deployment/AAS.Database.Setup/AAS.Database.Setup.sln" />
</ItemGroup>
Also ensure that you have the enough configurations set for processor settings;
<ConfigurationToBuild Include="Debug|x86">
<FlavorToBuild>Debug</FlavorToBuild>
<PlatformToBuild>x86</PlatformToBuild>
</ConfigurationToBuild>
<ConfigurationToBuild Include="Debug|Any CPU">
<FlavorToBuild>Debug</FlavorToBuild>
<PlatformToBuild>Any CPU</PlatformToBuild>
</ConfigurationToBuild>
<CustomBeforeWixTargets>$(MSBuildExtensionsPath)\Microsoft\WiX\v3.0\wix.ca.targets</CustomBeforeWixTargets>
</PropertyGroup>
<Target Name="Wix">
<Message Importance="low" Text="Starting WIX build"/>
<MSBuild Projects="@(WixProjectToBuild)" Properties="OutDir=$(OutDir);SourcePath=$(OutDir);Version=$(AssemblyVersion);FileVersion=$(AssemblyFileVersion);BuildNumber=$(BuildNumber);CustomBeforeWixTargets=$(CustomBeforeWixTargets)" Targets="Rebuild"></MSBuild>
</Target>
<!--WIX solutions-->
<ItemGroup>
<WixProjectToBuild Include="$(BuildProjectFolderPath)/../../Source_Code/Development/Deployment/AAS.Database.Setup/AAS.Database.Setup.sln" />
</ItemGroup>
Also ensure that you have the enough configurations set for processor settings;
<ConfigurationToBuild Include="Debug|x86">
<FlavorToBuild>Debug</FlavorToBuild>
<PlatformToBuild>x86</PlatformToBuild>
</ConfigurationToBuild>
<ConfigurationToBuild Include="Debug|Any CPU">
<FlavorToBuild>Debug</FlavorToBuild>
<PlatformToBuild>Any CPU</PlatformToBuild>
</ConfigurationToBuild>
Friday, December 4, 2009
Settings for using WSPBuilder with MSBuild or TFS Team Build
1) Install the latest WSPBuilder
2) Upload the WSPTools folder to TFS source control
3) Update the "Post Build" event with the one shown below. [Update the path to WSPBuilder.exe accordingly]
IF ("$(OutDir)")==("bin\Debug\") GOTO LocalBuild
:TfsBuild
MD "$(TargetDir)bin\Debug\"
COPY "$(TargetDir)*.dll" "$(TargetDir)bin\Debug\"
"D:\TFS Build Location\AAS Web Transform\AAS.DevelopmentBuild\AAS Demo\Sources\Tools\WSPTools\WSPBuilderExtensions\WSPBuilder.exe" -SolutionPath "$(TargetDir)" - OutputPath "$(TargetDir)"
RENAME "$(TargetDir)Debug.wsp" "$(ProjectName).wsp"
RMDIR "$(TargetDir)bin" /S /Q
RMDIR "$(TargetDir)12" /S /Q
GOTO Finish
:LocalBuild
$(TargetDir)..\..\..\..\..\..\Tools\WSPTools\WSPBuilderExtensions\WspBuilder.exe -SolutionPath "$(ProjectDir)" -OutputPath "$(TargetDir)"
:Finish
:TfsBuild
MD "$(TargetDir)bin\Debug\"
COPY "$(TargetDir)*.dll" "$(TargetDir)bin\Debug\"
"D:\TFS Build Location\AAS Web Transform\AAS.DevelopmentBuild\AAS Demo\Sources\Tools\WSPTools\WSPBuilderExtensions\WSPBuilder.exe" -SolutionPath "$(TargetDir)" - OutputPath "$(TargetDir)"
RENAME "$(TargetDir)Debug.wsp" "$(ProjectName).wsp"
RMDIR "$(TargetDir)bin" /S /Q
RMDIR "$(TargetDir)12" /S /Q
GOTO Finish
:LocalBuild
$(TargetDir)..\..\..\..\..\..\Tools\WSPTools\WSPBuilderExtensions\WspBuilder.exe -SolutionPath "$(ProjectDir)" -OutputPath "$(TargetDir)"
:Finish
Saturday, September 19, 2009
Import TFS Workitems through C# code
This is how you can import the TFS workitems through C# code
NetworkCredential objCre = new NetworkCredential(txtUserName.Text, txtPassword.Text, "TFS");
WebProxy objProxy = new WebProxy();
objProxy.Credentials = CredentialCache.DefaultCredentials;
TeamFoundationServer tfs1 = new TeamFoundationServer(txtTFSServer.Text, objCre);
tfs1.EnsureAuthenticated();
WorkItemStore store = (WorkItemStore)tfs1.GetService(typeof(WorkItemStore));
WorkItemCollection objColl = store.Query("SELECT [System.Id], [System.WorkItemType], [Microsoft.VSTS.Common.Rank], [System.State], [System.AssignedTo], [System.Title] FROM WorkItems WHERE [System.TeamProject] = 'Sample' AND [System.WorkItemType] ='Bug' AND [System.Title] CONTAINS '-ST-' ");
WebProxy objProxy = new WebProxy();
objProxy.Credentials = CredentialCache.DefaultCredentials;
TeamFoundationServer tfs1 = new TeamFoundationServer(txtTFSServer.Text, objCre);
tfs1.EnsureAuthenticated();
WorkItemStore store = (WorkItemStore)tfs1.GetService(typeof(WorkItemStore));
WorkItemCollection objColl = store.Query("SELECT [System.Id], [System.WorkItemType], [Microsoft.VSTS.Common.Rank], [System.State], [System.AssignedTo], [System.Title] FROM WorkItems WHERE [System.TeamProject] = 'Sample' AND [System.WorkItemType] ='Bug' AND [System.Title] CONTAINS '-ST-' ");
Before running this code ensure that you download and install the TFS SDK from microsoft site.
The following are the references you will have to add to the project
Microsoft.TeamFoundation.Client
Microsoft.TeamFoundation.WorkItemTracking.Client
Subscribe to:
Posts (Atom)